How to Build the Ultimate Retro Gaming Setup on a Budget

The Myth of the "Expensive" Retro Experience
If you listen to the collectors' forums or watch the high-end auction streams, you’d think that building a respectable retro gaming station requires a small inheritance and a dedicated climate-controlled vault. They’ll tell you that unless you have a mint-condition, original hardware console with a verified factory seal, you aren't a "real" enthusiast. That is absolute nonsense.
As someone who spent years in QA testing hardware stability and now spends my weekends diagnosing capacitor leaks in vintage consoles, I can tell you that the "authenticity" argument is often a mask for poor optimization. You don't need a pristine 1990s CRT setup to enjoy the golden age of gaming. You need a strategic approach to hardware, software, and display technology. You can achieve 95% of the original experience for a fraction of the cost if you know where to look and what to ignore.
In this guide, I’m going to strip away the marketing fluff and give you a technical blueprint for building a high-performance retro setup on a budget. We aren't just looking for nostalgia; we are looking for low input lag, accurate color reproduction, and reliable hardware.
Step 1: Choosing Your Architecture (Original Hardware vs. Emulation)
The first decision you have to make is your foundation. Do you want the actual silicon that the developers intended, or do you want the convenience of modern emulation? Both have merits, but from a technical standpoint, they serve different goals.
The Case for Original Hardware
There is a specific tactile sensation to original hardware that emulation struggles to replicate—not just in the software, but in the physical interaction. However, if you go this route, you must be prepared for the maintenance. Old consoles are prone to component failure. Capacitors leak, and battery-backed saves die. If you choose this path, I highly recommend learning basic soldering skills. It’s much cheaper to replace a $2 capacitor than to buy a new console when the original one dies due to a preventable hardware failure.
The Case for Emulation (The Budget King)
For most people, emulation is the superior choice for a budget build. A single mid-range PC or even a high-end single-board computer (like a Raspberry Pi 5 or a refurbished Mini PC) can house thousands of libraries. The key here is optimization. Don't just download a ROM and hit play. To get the most out of your setup, you need to understand how shaders and core configurations work to mimic the look of old CRT televisions. This is where the real fun begins—tuning the software to make a modern LCD look like a vintage broadcast.
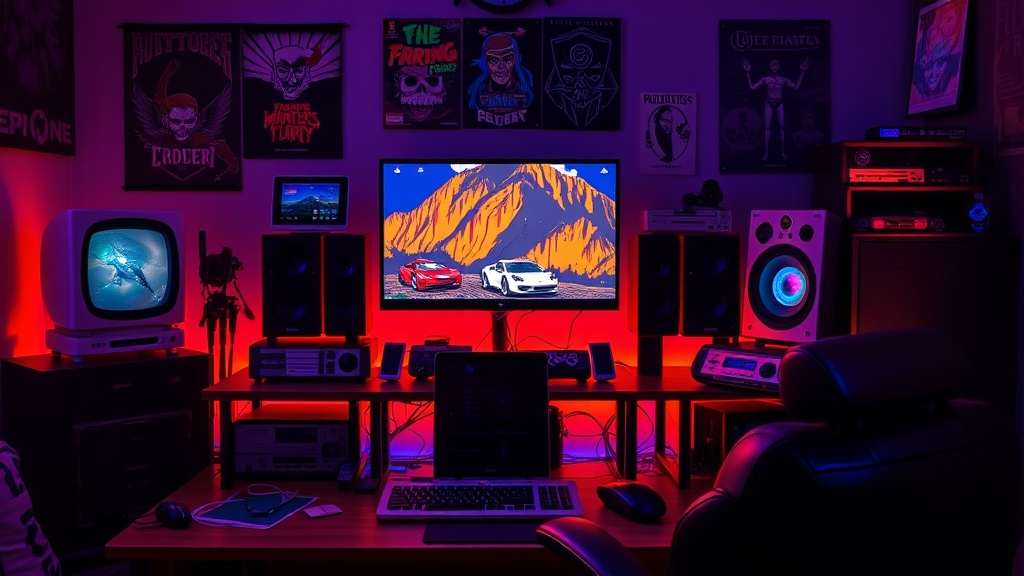
Step 2: The Display Dilemma—CRT vs. LCD
This is where most budget builds fail. If you plug a Super Nintendo into a modern 4K OLED TV, it will look terrible. The image will be blurry, the colors will be washed out, and the input lag will make precision platformers a nightmare. This happens because modern TVs are designed to upscale high-resolution signals, and they struggle with the low-resolution, non-standard aspect ratios of retro games.
You have two viable paths:
- The Purist Path (CRT): Finding an old tube television is the best way to achieve authentic scanlines and zero input lag. However, CRTs are heavy, difficult to transport, and can be unreliable. If you find one at a thrift store, check the brightness and look for any "ghosting" issues before committing.
- The Modern Path (LCD with Shaders): If you are using a modern monitor or TV, you must use an emulator that supports CRT-Geom or GLSL shaders. These shaders simulate the phosphor glow and the curvature of a glass screen. This is the secret to making a $150 monitor look like a $500 vintage setup.
If you find yourself getting too deep into the technical nuances of how games are rendered, you might find interest in the evolution of procedural generation, which explains how early hardware limitations forced developers to be incredibly clever with how they built worlds.
Step 3: Input Latency and Controller Selection
You can have the most beautiful, shader-perfect screen in the world, but if your controller has 50ms of input lag, your gameplay experience is ruined. This is especially true for fighting games or high-precision action titles. When I was in QA, we used to run frame-by-side comparisons to measure exactly how much delay a certain peripheral introduced into the loop.
For a budget build, avoid cheap, unbranded wireless controllers. Bluetooth is notorious for introducing variable latency. Instead, look for:
- Wired USB Controllers: A wired connection is the gold standard for low latency. If you want the "authentic" feel, look for 8BitDo products. They are affordable, highly compatible with modern OSs, and offer excellent build quality that mimics original hardware.
- The "Feel" of the Era: If you are playing certain classics, the physical layout of the buttons matters. For example, if you are diving into retro RPGs that still hold up in 2024, you might want a controller with a more traditional D-pad rather than a modern analog stick, as many older titles were designed specifically for digital input.
Once you have your hardware dialed in, don't forget to practice. Mastering your controller is a skill that translates across generations; whether you're playing a modern shooter or an old-school arcade game, understanding your input thresholds is vital.
Step 4: Optimizing the Software Stack
If you are building an emulation-based rig, your "Operating System" is essentially your storefront. I recommend using RetroArch or a dedicated front-end like EmulationStation. These tools allow you to organize your library and, more importantly, manage your "cores."
A "core" is the actual emulation engine. For example, if you want to play SNES games, you shouldn't just use any SNES core. You should test several to see which one handles the specific frame-timing of the game most accurately. Some cores are better at handling audio latency, while others are better at graphical accuracy. This level of granular control is what separates a "casual" setup from a high-performance one.
This obsession with detail is common in many genres. For instance, the way modern games use procedural generation as a secret sauce is a direct descendant of the technical constraints and clever workarounds used in the 8-bit and 16-bit eras. Understanding the "why" behind the tech helps you appreciate the "how" of your setup.
Step 5: Maintenance and Longevity
Whether you bought a used console or built a PC, your setup needs maintenance. If you went the hardware route, keep an eye on your environment. Humidity is the enemy of vintage electronics. If you live in a damp climate, a small dehumidifier in your gaming room isn't an "extra"—it's a necessity to prevent corrosion on your circuit boards.
If you are using a modern PC/Mini-PC build, the biggest threat is thermal throttling. Ensure your case has adequate airflow. If your emulation machine starts lagging after an hour of play, it’s likely not the software—it’s your hardware getting too hot and dropping its clock speeds. Clean out the dust every six months. It sounds basic, but it's the difference between a machine that lasts a decade and one that dies in two years.
Final Thoughts: The Value of the Build
Building a retro setup shouldn't be about how much money you spend; it should be about how much control you have over the experience. By focusing on input latency, shader accuracy, and reliable hardware, you can create a station that rivals much more expensive setups.
Don't let the "collector" culture intimidate you. Whether you are playing through the golden era of JRPGs or just trying to beat a high score in an arcade classic, the goal is the same: a seamless, immersive connection to the game. Now, go out there, find some decent hardware, and start building.
Steps
- 1
Source Your Hardware
- 2
Optimize the Display
- 3
Manage Your Cables
- 4
Set the Aesthetic